June 12, 2011

Gunpla Tools Shopping

This weekend I had to go shopping for 'pulang kampung' next week.. So it's a chance for a visit to the gunpla store! ^^/ Here's what I bought:


Tamiya File set (for sanding)


Plastic cement for seam line removal


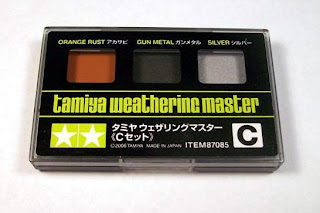
Weathering Kit


Thinner


Mr. Hobby Mr.Base White 1000


Black Color
I tried the tamiya file, and it's really convenient *throw away sanding disc* ^^ Use it for initial sanding.
I meant to buy Tamiya XF-21 Flat base for mixing with future to produce glossy top coat, but instead I bought Mr.base white 1000 -_- So I red some articles about base white 1000 and turn out it's good for priming and surfacing (mixed with thinner), read from here and here. Maybe I'll try someday :)
Bought black spray paint for Seravee when I do seam line removal on the kit. And for the weathering kit, hehe I'm saving for the future. All of this are worth of a 1/100 NG gunpla ^^;;


AND THIS WEEK WORK LOG, I did seam line removal practicing on RX-78 03 legs. Here's the result:

The right is ok, but left one failed. I tried with unknown plastic cement from Ace's hardware, turned out it doesn't melt.
Better stick with Tamiya/Mr.Hobby cement
Both are ok :) My sanding skill (or patience) still not good enough, scratches still noticeable :(
Seam line removed and primed! :D They say model kit look great in prime, it's true ^^
Notice, I didn't do sprue cleaning (lazy me) :p


What's happening to me? I'm changing..


My legs!?! what they've done to my legs!?
The shoulder have been primed and painted. It doesn't look like plastic anymore,
but it doesn't look like made of steel also. It's gritty, looks like made of clay or stone.
Is it the primer? I need to try different primer to find out.

That's all.. I'll be busy next two weeks, marriage preparation ^^

June 6, 2011

Practicing Seam Line Removal

I tried seam removal for the first time yesterday.. I did it on RX-79 blue destiny cause I'm not sure what's going to happen (poor BD) :-s

Basically I did these:
- Dissembled the parts to be fixed, in this case shoulder of RX-79 BD 3.
- Applied plastic cement on the edges
- Joined them again and squeezed. The edges melted to each other.
- Waited until dry and we are left with the excess melted plastic instead of seam gap.
- Sanded the excess plastic with sanding stick until the excess gone. Then smoothed with finer grit sandpapers. Sanded like crazy!
- Painted with primer.


Shoulder of RX-79 BD 3

The part which I highlighted used to have seam lines, now it's gone :)
I still need to get the right sanding tools and technique.. It's tiring ^^;
I'm gonna practice one or two times again before doing it on Seravee.
Ooh I found this tutorial also, very good one to watch: http://www.youtube.com/watch?v=oXTK9KdRQN4
Related Posts with Thumbnails