Showing posts with label Designer Color. Show all posts

April 16, 2012

Seravee WIP: Decaling

Finished decaling Seravee Designer Color.. Finally it doesn't look boring white or black anymore haha..
I smeared glossy coat before applying decals.
Here some photos to enjoy :)

All lined up and ready

Please refer to manual.

Some close up

Right shoulder is jealous of left shoulder, why nothing for the right?

Another big one on left foot (and yes nothing for the right)

Left foot

Designer color decals is just nice :)

Seraphim got some nice greeneries

I wish it glows in the dark XD

a little close up

Weapon of overly-mass destruction!
Another top coat and ready for some pose shootings ^^.

March 18, 2012

Seravee WIP: Painting

Finally finished (partly) repainting Seravee ^^/ In the midst of top coat now..

Repainted the Whites, can't really see the difference.. need to go macro ^^;;

Before
After Before

Close up on hand

Repainted the black parts :) Except the chest, can't unsnap it..

After top coat is decals and panel wash, until then ^^/

March 14, 2011

Seravee Designer Color [Work Log]

And so the next build is on! ^^ It's Seravee Gundam Designer Color, from Gundam 00 2nd season.
Actually want to buy 00 Raiser designer color, but out of stock -_- Seravee still on stock, so I thought might as well upgrade my most sentimentil gunpla (you know who) hehe..


So in the past two weekends, I have started Seravee build. I change my building steps on this kit.
1. Now I'll do snapfit until finish before sanding the visible excess sprue, before I snap and sand first before putting all together.
2. During snapfit, I also prepare for easy disassembling later by cutting the male peg diagonally (sorry didn't take pic -_-). I may need to disassemble for sanding and painting later (tiny chance i'm gonna do it)


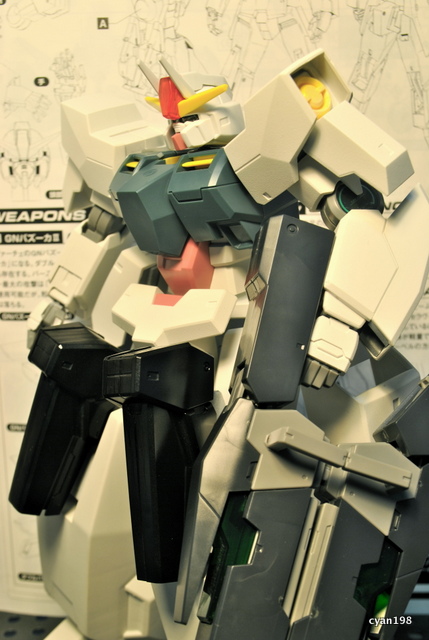
Anyway some comments on the parts (above, comparing with the anime illustration):
1. The clear part on center of the head supposed to look red, but the sticker inside doesn't really do the job.
2. The eyes when LED is on, doesn't have shape since the light is scattered.
3. The small lowered hole in the chest, looks unrealistic. Supposed to be screw-like hole, don't know how to make it looks real, hand paint, drill a hole and put some small screw? *chicken out* XD 


So at least I did something with the first two. I painted the clear part with semi clear red. And I cut eyes shape holes on the eyes sticker (which wasn't used anymore), to only allow light through the eyes hole. There're still detail flaws on the hole I need to fix though. Looks better right? Now what to do with the chest? :-\


And as usual the seam lines hell XD I never removed seam line before. Maybe I'll try this time, but on different kit first, maybe blue destiny..


So this is as far as i get last two weekends, still looking plain without decals and lining :)  No it isn't finish snapfitting yet, since Seravee has 'two' bodies XD

~till next post..

February 2, 2011

WIP VI: Arios Stripe Flavor


Finally finished sticking the dry stickers (only available in Designer Color) for Arios, it's one hell of a time. There are lots and difficult to stick on exact position. You'll notice from the photo some positioning errors :p But He's still look great, right? ^^ Here's the comparison before and after sticker.


Temukan lah 101 perbedaan dari gambar diatas XD

After this, still need to do lining and top coat to protect the stickers.. *roger and out*

January 30, 2011

WIP V: Arios Designer Color, and some shopping

Today 30 Jan 2011, I hereby finished snap fitting Arios! XD Bought the kit at June 2010, haha what have I been doing.. -_- There he is standing really tall. Now the tallest of my collection, around 1 half centimeters taller than Exia..


I still need to put the dry stickers, lining and top coat.. eermm, which one first? Afraid to damage the stickers with the top coat *no clue*

And by the way, yesterday on a long journey inside a mall, I stopped by at gunpla shop. After an hour inside drooling at MG and PG kit (ooh I really want Astray red frame, that is real Vagabond XD. Also saw 00 Raiser designer color, aarghh Godlike! *mari ngumpulin duit*), I bought these.. ^^


A cutting mat! Finally I got one haha.. now my table won't suffer from the knife anymore.. *elus2 meja*


And Chibi SD Gundam Unicorn! XD Even though It will be Rabbit year.. *apa hubungannya* :p He's gonna be one of cute collection ^^ I thought it's gonna be relatively easy, but quick look at the guide maybe it's not. There are very tiny stickers which will be difficult to stick at the right place..

So lets try to finish Arios before CNY holiday! Yoshh!!

June 9, 2010

New Project: Arios Gundam Designer Color

Hey guys! how r u all? :)

Since I'm (almost) finished with the Kshatriya (left with decals n top coat), and to put a healthy competition with my fellow Arrel :D I decided to buy myself the next project :D If you know me, it won't be faraway from Gundam 00 series ;p After doing a bit eye-shopping in the net (especially dalong.net), I decided to buy 1/100 Arios Gundam Designer color! XD


Here's what makes me drools over:
  • From 00 series (of course!)
  • Nice color (softer color than the normal version)
  • Got loads of sticker for the extra touch up (looks like decals in a quick look)
  • Good articulation (based on dalong's review)
  • Gonna be my first transformable Gundam! XD
  • Has LED for the eyes, coool! :D
  • Fit automatically to my gundam story project XD
  • hmm what else..?


Related Posts with Thumbnails